macOS menu bar app with SwiftUI

Anagh Sharma

Author

schedule

4m 23s

event

Jul 17, 2020

Share
Share

Building a macOS menu bar app is now easier than ever with SwiftUI.

Last June, Apple unveiled its brand new UI framework - SwiftUI. It’s declarative, which means you just have to ‘declare’ or tell what you need in the UI and the framework will take care of the rest. This makes SwiftUI powerful whilst easy to learn and use. Hence, a lot of new folks are gonna jump in who have no or negligible prior experience in developing for various Apple platforms. But there’s a caveat here - since it’s new, it comes with its own set of bugs and limitations.

Nevertheless, when you start Xcode, starting an iOS or macOS project with SwiftUI is easy but it can be quite tricky to build something which is not there in the official tutorials e.g. a macOS menu bar app. And this is what this blog post is all about.


LET'S GET STARTED

We will be building a macOS menu bar app using SwiftUI. Since SwiftUI is all about writing views (UI) and the methods to populate data in those views, we just have to take care of the menu bar app creation and popup logic. So without any further ado, let’s start.

STEP 1: Create a new macOS app project with the User Interface option set to SwiftUI.

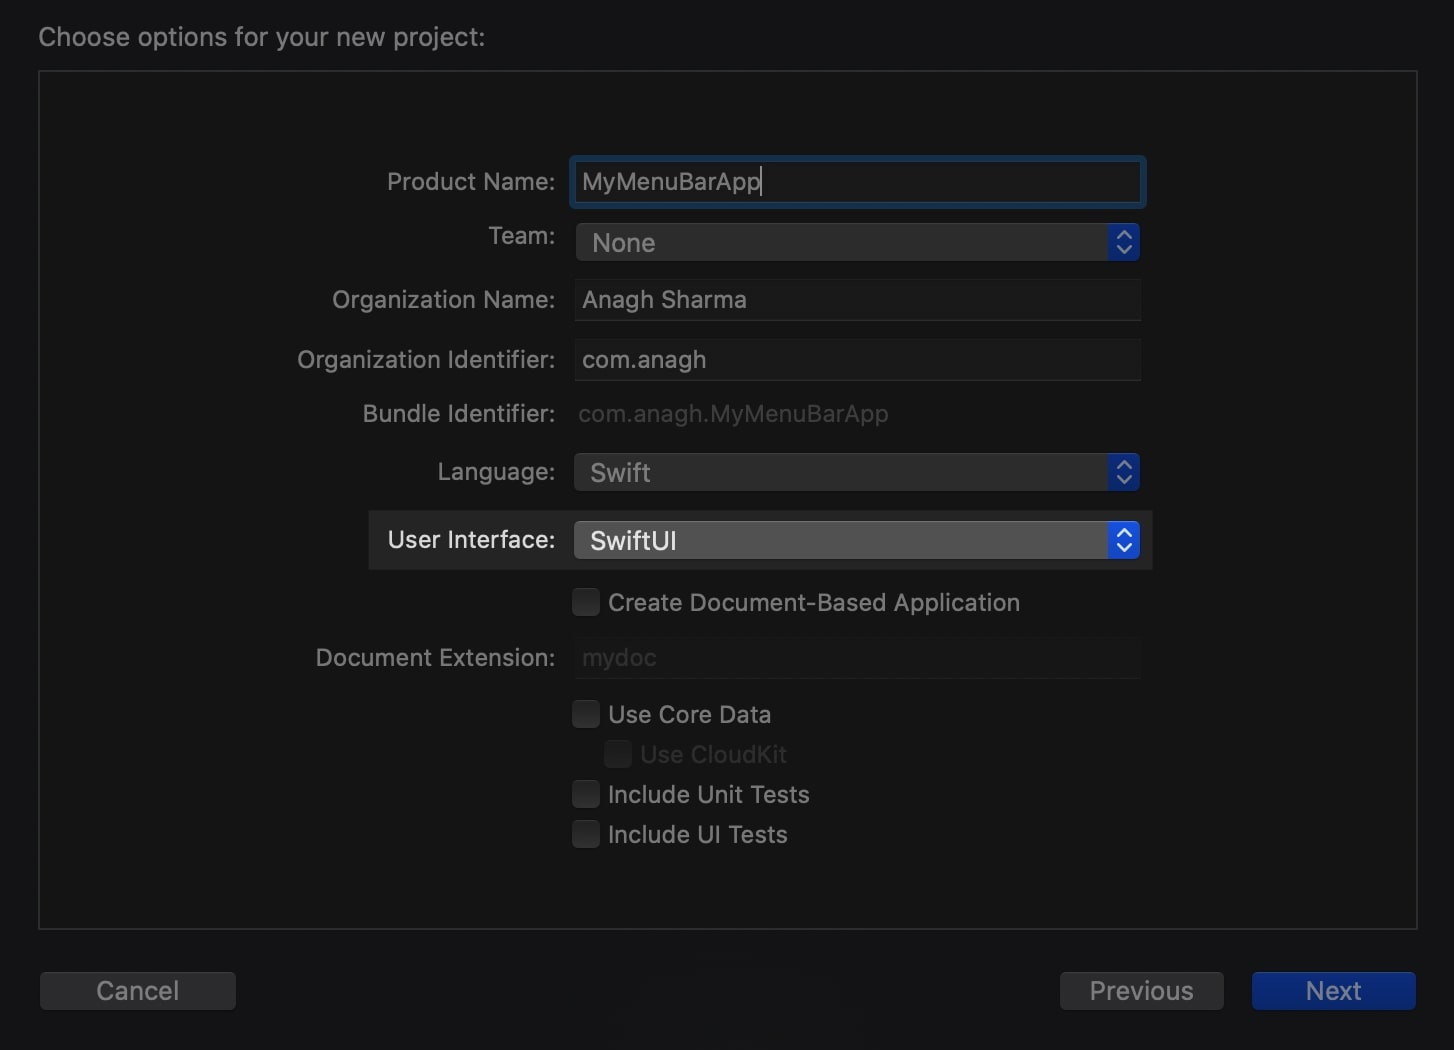
Before trying anything out, run the app. It should run just fine, showing a window with “Hello, World!” in the centre.

Now we just have to write some logic to render this same view (ContentView.swift) in a popover which a user can open from the menu bar. That’s it.


STEP 2: Adding a status bar item which appears in the menu bar - we’ll start with a new class named `StatusBarController.swift`.

import AppKit

class StatusBarController {
    private var statusBar: NSStatusBar
    private var statusItem: NSStatusItem
    
    init() {
        statusBar = NSStatusBar.init()
        // Creating a status bar item having a fixed length
        statusItem = statusBar.statusItem(withLength: 28.0)
        
        if let statusBarButton = statusItem.button {
            statusBarButton.image = #imageLiteral(resourceName: "StatusBarIcon")
            statusBarButton.image?.size = NSSize(width: 18.0, height: 18.0)
            statusBarButton.image?.isTemplate = true
        }
    }
}
  • StatusBarIcon is the icon that you want in the menu bar. Use a high quality square png icon.

  • .isTemplate makes sure that the icon updates its appearance accordingly on system theme change.


Next, we will be creating an instance of this class when the app launches and see if it is working. For that, we will have to make changes in `AppDelegate.swift`.

import Cocoa
import SwiftUI

@NSApplicationMain
class AppDelegate: NSObject, NSApplicationDelegate {

    var window: NSWindow!
    var statusBar: StatusBarController?

    func applicationDidFinishLaunching(_ aNotification: Notification) {
        // Create the SwiftUI view that provides the window contents.
        let contentView = ContentView()

        // Create the window and set the content view. 
        window = NSWindow(
            contentRect: NSRect(x: 0, y: 0, width: 480, height: 300),
            styleMask: [.titled, .closable, .miniaturizable, .resizable, .fullSizeContentView],
            backing: .buffered, defer: false)
        window.center()
        window.setFrameAutosaveName("Main Window")
        window.contentView = NSHostingView(rootView: contentView)
        window.makeKeyAndOrderFront(nil)

        //Initialising the status bar
        statusBar = StatusBarController.init()
    }

    func applicationWillTerminate(_ aNotification: Notification) {
        // Insert code here to tear down your application
    }
}

Run the app. You should now be able to see your app in the menu bar. So far so good.


Now, we do not need the Window and the dock icon since we want to launch the app from the menu bar only. To do so - * Remove all the code related to `Window` from AppDelegate.

import Cocoa
import SwiftUI

@NSApplicationMain
class AppDelegate: NSObject, NSApplicationDelegate {
    var statusBar: StatusBarController?

    func applicationDidFinishLaunching(_ aNotification: Notification) {
        // Create the SwiftUI view that provides the contents
        let contentView = ContentView()

        // Create the Status Bar Item with the Popover
        statusBar = StatusBarController.init(popover)
    }

    func applicationWillTerminate(_ aNotification: Notification) {
        // Insert code here to tear down your application
    }
}

Run the app. Now there should be no more Hello, World! window. But the dock icon is still there. For that -

  • Add a new entry in the file Info.plist (which is already there in your project). Add Application is agent (UIElement) and set its value to YES. This entry makes sure that our app runs as an agent and hence the dock icon is not needed. Now run the app again, you should now see your app in the menu bar only.


STEP 3: Adding logic so that the app opens a popover - now we just have to add a popover which responds to the status bar item button that we created in `StatusBarController.swift`. We need to make a few changes in that class -

import AppKit

class StatusBarController {
    private var statusBar: NSStatusBar
    private var statusItem: NSStatusItem
    private var popover: NSPopover
    
    init(_ popover: NSPopover) {
        self.popover = popover
        statusBar = NSStatusBar.init()
        // Creating a status bar item having a fixed length
        statusItem = statusBar.statusItem(withLength: 28.0)
        
        if let statusBarButton = statusItem.button {
            statusBarButton.image = #imageLiteral(resourceName: "StatusBarIcon")
            statusBarButton.image?.size = NSSize(width: 18.0, height: 18.0)
            statusBarButton.image?.isTemplate = true
            
            statusBarButton.action = #selector(togglePopover(sender:))
            statusBarButton.target = self
        }
    }
    
    @objc func togglePopover(sender: AnyObject) {
        if(popover.isShown) {
            hidePopover(sender)
        }
        else {
            showPopover(sender)
        }
    }
    
    func showPopover(_ sender: AnyObject) {
        if let statusBarButton = statusItem.button {
            popover.show(relativeTo: statusBarButton.bounds, of: statusBarButton, preferredEdge: NSRectEdge.maxY)
        }
    }
    
    func hidePopover(_ sender: AnyObject) {
        popover.performClose(sender)
    }
}

The initialiser takes a parameter of type NSPopover. This popover member can then be shown/hidden on-demand using the member functions that we have defined.


Finally, we have to define a popover which has the SwiftUI view set as its content view and pass it while initialising the `StatusBarController.swift` class. For this we need to update the AppDelegate -

import Cocoa
import SwiftUI

@NSApplicationMain
class AppDelegate: NSObject, NSApplicationDelegate {
    var popover = NSPopover.init()
    var statusBar: StatusBarController?

    func applicationDidFinishLaunching(_ aNotification: Notification) {
        // Create the SwiftUI view that provides the contents
        let contentView = ContentView()

        // Set the SwiftUI's ContentView to the Popover's ContentViewController
        popover.contentSize = NSSize(width: 360, height: 360)
        popover.contentViewController = NSHostingController(rootView: contentView)
        
        // Create the Status Bar Item with the above Popover
        statusBar = StatusBarController.init(popover)
    }

    func applicationWillTerminate(_ aNotification: Notification) {
        // Insert code here to tear down your application
    }
}

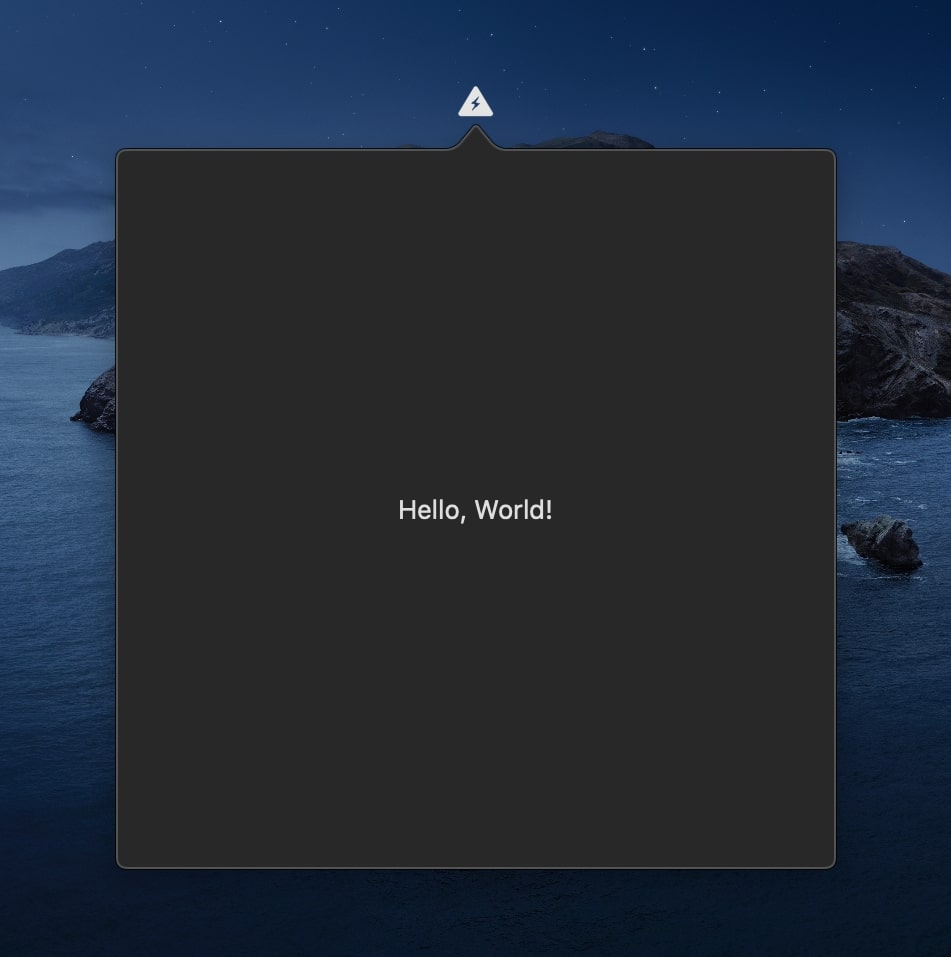
Voila. Run the app, click on the menu bar app icon and you should see the popover with the same “Hello, World!”.


ADDITIONAL FUNCTIONALITIES

STEP 4: Adding logic so that the popover closes automatically when clicked outside - if you want the popover to close automatically whenever you click anywhere outside, you’ll have to write the logic for it. For this, we will be creating a new class - `EventMonitor.swift`.

import Cocoa

class EventMonitor {
    private var monitor: Any?
    private let mask: NSEvent.EventTypeMask
    private let handler: (NSEvent?) -> Void
    
    public init(mask: NSEvent.EventTypeMask, handler: @escaping (NSEvent?) -> Void) {
      self.mask = mask
      self.handler = handler
    }

    deinit {
      stop()
    }

    public func start() {
        monitor = NSEvent.addGlobalMonitorForEvents(matching: mask, handler: handler) as! NSObject
    }

    public func stop() {
      if monitor != nil {
        NSEvent.removeMonitor(monitor!)
        monitor = nil
      }
    }
}

What this class does is that it monitors for global events, events that are outside the scope of your application such as the mouse click, or a gesture. For our case, we are going to monitor the left and right-click mouse events -

eventMonitor = EventMonitor(mask: [.leftMouseDown, .rightMouseDown], handler: mouseEventHandler)

In the mouseEventHandler we are going to write the logic to hide the popover whenever the monitored event(s) occur.

func mouseEventHandler(_ event: NSEvent?) {
    if(popover.isShown) {
        hidePopover(event!)
    }
}

Now you just have to start the monitoring when the popover is shown and stop it when the popover is hidden.


STEP 5: Adding logic so that you can run a piece of code every time the popover appears - there can be a requirement when you would want to run a piece of code every time the popover is shown. Of course, you can use the `.onAppear` modifier in SwiftUI if you want to perform the action only once, the first time the popover is shown. But this is not what we want. We want to run a piece of code, say fetching the air quality index, every time the popover is shown. Doing so is somewhat tricky. But I have somewhat of a hack here -

  • If you are coming from UIKit, you know that there is a method named `viewDidAppear` which “notifies the view controller that its view was added to a view hierarchy.” We will be using this method.

  • To use this method, we need a View Controller. There is this `Main.storyboard` file in this project which we never touched. We will need this now. Select this file and add a View Controller from the Object Library.


  • We will then have a custom View Controller class to override viewDidAppear. Add a new class MainViewController.swift in your project. Make sure it inherits from NSViewController so that we can use this as a custom class for our View Controller that we added in the previous step.


  • After setting the custom class, we just need to set this newly created class as the popover’s contentViewController in AppDelegate -


    import Cocoa
    import SwiftUI
    
    @NSApplicationMain
    class AppDelegate: NSObject, NSApplicationDelegate {
        var popover = NSPopover.init()
        var statusBar: StatusBarController?
    
        func applicationDidFinishLaunching(_ aNotification: Notification) {
            // Create the SwiftUI view that provides the contents
            let contentView = ContentView()
    
            // Set the SwiftUI's ContentView to the Popover's ContentViewController
            popover.contentViewController = MainViewController()
            popover.contentSize = NSSize(width: 360, height: 360)
            popover.contentViewController?.view = NSHostingView(rootView: contentView)
            
            // Create the Status Bar Item with the Popover
            statusBar = StatusBarController.init(popover)
        }
    
        func applicationWillTerminate(_ aNotification: Notification) {
            // Insert code here to tear down your application
        }
    }

Phew, this is it. We’ve successfully set up our `MainViewController`. You can now override the `viewDidAppear` method in it to post a notification and observe it in a View Model where you want to fetch the data for your SwiftUI view every time the popover appears.


WRAPPING UP

This post turned out to be longer than I expected but I hope it turned out to be useful for you. SwiftUI is fun and building a macOS menu bar app is easier than ever now. I have made this entire project available for use as a GitHub template repo. If you build something cool using it, let me know.


// KEEP MAKING


REFERENCES

S

G

X

T

O

J

K

D

E

S

I

G

N

Q

+

B

Z

W

P

A

M

M

A

K

E

R

S

U

Y

O

L

O

H

G

V

Work In Progress.

Last updated on 14 Feb 2024

© 2016–2024

, Anagh Sharma.

Handcrafted with 🤍.